Sunday, November 7, 2010

Kicks Over time in Finale

In today's blog to kick off the second Notation Week of the semester, we'll take a look at one of the most frequently asked Finale questions here at the LC: "How do I do kicks over time?"
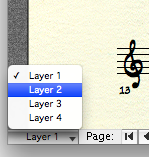
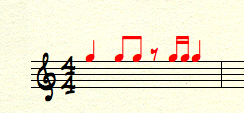
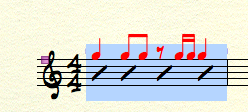
1. Add notes into the second layer (switch layers in the bottom left corner of the window) up above the staff like this. Flip their stems using the keyboard shortcut “L”, and move the rest so it floats above by selecting the rest with the simple entry tool (option + click) and using the up and down arrows.


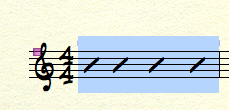
2. Select the staff tool, select the measures you want to have slash notation, and choose Apply Staff Style from the Staff menu. Choose slash notation. Now your notes are hidden behind the slashes, which we have to fix.


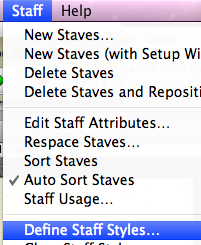
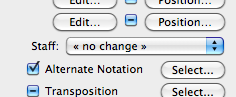
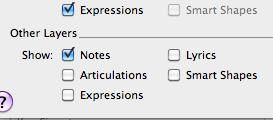
3. Choose Define Staff Styles from the staff menu, click select next to Alternate Notation, and check Notes under Other Layers.


4. VoilĂ ! Kicks over time!

Thursday, November 4, 2010

Setting Up a Basic Ableton Live Set

The Learning Center Work Studies are contributing their wealth of knowledge to the blog now! For our first post by a work study Eric Tait, Lab Monitor here at the LC and Electronic Production and Design Major, will explain setting up a basic Ableton Live Set.
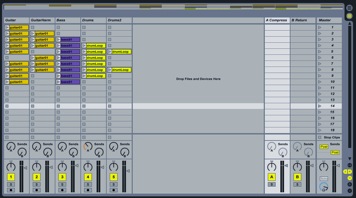
Let’s take a look at setting up a simple Live Set for a performance. First, we’ll add an audio file into the first slot of track 1. All you have to do is locate your audio file in Finder and then drag it right over the slot, and Ableton will load the data. In this example, I used a guitar loop. In the second track I dragged the same loop, but will later change its pitch to create a harmony part. After that come bass, drums, and a drum “fill” track that uses the Beat Repeat to create some variation
.
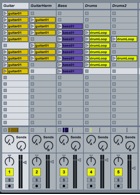
The vertical columns are called Tracks while the horizontal rows are called Scenes. The audio loops in this example are arranged into ten different scenes, all of which can be launched by clicking the Scene Launch buttons, which are the small triangles located in the Master track on the right side of the screen. Launching by scene makes live performances easier, as the user can arrange the loops however he or she likes and launch the simultaneously.

Now that our loops are in place and arranged for a performance, we can add other elements. We’ll start by adding a Beat Repeat to the second drum track. Beat Repeat can be found in the Live Devices menu on the left side of the screen under Audio Effects. To add it to the drum track, simply click and drag it onto the track. The device will appear in the effects area at the bottom of the screen.
Next we’ll add a Compressor to an Auxiliary track for the drums. Once again, this effect can be found in the Live Devices under Audio Effects, but this time, we’ll drag it onto auxiliary track A on the right side of the Live screen. I decided that I wanted the drums to sound a little bigger, so I turned up send A on the drum track. This means that the drums will be processed through the compressor on Aux A, but the dry signal will also still be playing back from the original drum track.
To change the pitch of an audio file, simply double-click on the loop and adjust the dial labeled Transpose however you’d like. In this example, the second guitar part is transposed up +4, or a major third.
Now that everything is set up how I want it, it’s time to record. Click the record button in the transport menu at the top of the screen. Once a scene or single loop is launched, the recording will begin. All changes will be recorded, including loop and scene launches, plus any parameter changes that you may decided to use, including changes to the Compressor, Beat Repeat, or volume or panning on any track. Once the recording is finished, you can go back and see what you’ve done in the Arrange window. This can be accessed by clicking the button with three horizontal lines at the top right of the screen, or by simply pressing Tab on the keyboard.
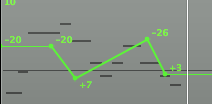
In this window we can cut loops short if they were played when they weren’t supposed to be, or extend them farther. We can also manually adjust automation curves simply by clicking.

Wednesday, October 27, 2010

Automation in Logic

In Logic Express and Pro you can automate almost anything you like. Want the volume of a track to fade in? No problem! Want to control the frequency cutoff of your low pass filter? You got it!
Just enable automation mode: (keyboard shortcut A)

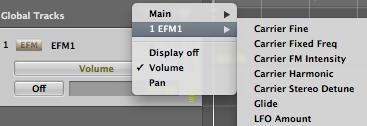
and choose what you would like to automate:

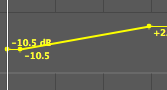
Then with the arrow tool, click to add new automation anchor points and drag them around as you like:

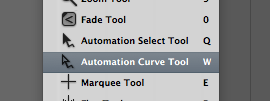
If you want to get all fancy, choose the automation curve tool and change the slope of the automation line:


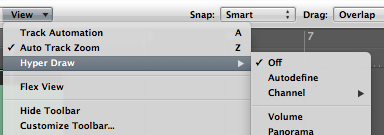
Access more automatable parameters by going to the Arrange window View menu, and open the Hyper Draw drop down menu.

Wednesday, October 13, 2010

Drag Dashboard Widgets onto Your Desktop


Liberate your widgets from the Dashboard--place them on your desktop instead.
One of the most interesting Terminal tips enables you to drag your widgets out of the Dashboard and onto the desktop, where they float above open applications and Finder windows, akin to the Gadgets in Windows Vista’s sidebar. To activate it, type: defaults write com.apple.dashboard devmode YES
You must then log out and log back in, or restart your machine. You can now capture a widget by clicking and holding it, and pressing F12 to dismiss the Dashboard and drop it on your desktop. By capturing a widget that’s on your desktop and pressing F12, you can return it to your Dashboard too. Widgets placed on the desktop function just like they do on the Dashboard.
To disable this feature, repeat the command, replacing YES with NO. Again, you must log out and log in again or restart your Mac for the change to take effect, after which widgets that are already on the desktop can be returned to the Dashboard, but there they must remain.
More Terminal Tips at:
http://www.maclife.com/article/howtos/25_top_os_x_terminal_tips?page=0,2

Sunday, October 3, 2010

"Discovering Reason"

This week is Reason week at the Learning Center, so the blog posts this week will all be offering useful tips, tricks, and resources for beginning through advanced Reason users.

A great place to start learning Reason (other than the Learning Center's Training Sessions!) is Propellerhead's website.  Besides video tutorials ranging from basic to in-depth explanations of each device in Reason, the tutorials section offers a 36 article series entitled  "Discovering Reason."  These articles are great for people with a fairly good understanding of the devices, but who want to amp up their understanding of Reason, and learn new techniques and effects.  

There are tutorials on advanced and creative uses of common devices such as Dr. REX and Redrum, as well as tips on using the less used and understood devices like the Combinator, Matrix, and Spiders.  There are also 16 articles on "Thor Demystified" because who couldn't use some help with that one!

Check out "Discovering Reason" and start exploring the abundant possibilities to make your Reason projects more interesting and unique.

Friday, October 1, 2010

Finale Formatting- Part 2

The systems in Finale can be rearranged however you choose. For most types of page/music formatting, you will use the Page Layout tool. When selecting the tool, you may notice a lot of "gray boxes" on the page- these are the individual "margins" for each system.


One of the most useful menu items under the Page Layout menu is "Space Systems Evenly..."


In the window that pops up, you can choose to place the maximum number of systems on the page without overlapping system margins. The systems are spaced based on a "top margin" and a "bottom margin" on the page.


You could also force a specified number of systems, and you can specify whether you which pages you want to affect.

Thursday, September 30, 2010

Finale Formatting- Part 1

The size of the music (notes, staves, etc) in Finale can be changed using the Page Layout tool. Perhaps the default music size looks too big or clumsy for the score you're writing. Other times, you may need to make the systems smaller before moving and rearranging the number of systems per page (very common).
To resize the music, under Page Layout menu, go to "Resize Staff System (system reduction)..."
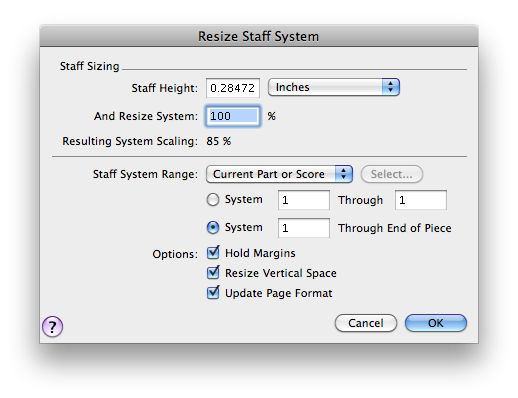
In the "Resize Staff System" menu, you can resize the music by a percentage of the staff height. This way, 100% is always fixed (you can always return to 100% if you don't like the appearance of your resized music).

In part 2, we'll look at how to rearrange the systems on a page.