


The Learning Center Work Studies are contributing their wealth of knowledge to the blog now! For our first post by a work study Eric Tait, Lab Monitor here at the LC and Electronic Production and Design Major, will explain setting up a basic Ableton Live Set.
Let’s take a look at setting up a simple Live Set for a performance. First, we’ll add an audio file into the first slot of track 1. All you have to do is locate your audio file in Finder and then drag it right over the slot, and Ableton will load the data. In this example, I used a guitar loop. In the second track I dragged the same loop, but will later change its pitch to create a harmony part. After that come bass, drums, and a drum “fill” track that uses the Beat Repeat to create some variation
.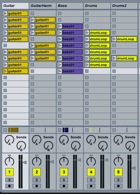
The vertical columns are called Tracks while the horizontal rows are called Scenes. The audio loops in this example are arranged into ten different scenes, all of which can be launched by clicking the Scene Launch buttons, which are the small triangles located in the Master track on the right side of the screen. Launching by scene makes live performances easier, as the user can arrange the loops however he or she likes and launch the simultaneously.
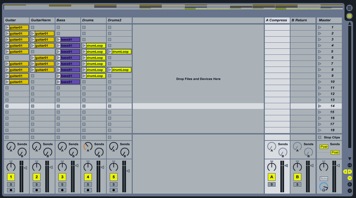
Now that our loops are in place and arranged for a performance, we can add other elements. We’ll start by adding a Beat Repeat to the second drum track. Beat Repeat can be found in the Live Devices menu on the left side of the screen under Audio Effects. To add it to the drum track, simply click and drag it onto the track. The device will appear in the effects area at the bottom of the screen.

Next we’ll add a Compressor to an Auxiliary track for the drums. Once again, this effect can be found in the Live Devices under Audio Effects, but this time, we’ll drag it onto auxiliary track A on the right side of the Live screen. I decided that I wanted the drums to sound a little bigger, so I turned up send A on the drum track. This means that the drums will be processed through the compressor on Aux A, but the dry signal will also still be playing back from the original drum track.
To change the pitch of an audio file, simply double-click on the loop and adjust the dial labeled Transpose however you’d like. In this example, the second guitar part is transposed up +4, or a major third.
Now that everything is set up how I want it, it’s time to record. Click the record button in the transport menu at the top of the screen. Once a scene or single loop is launched, the recording will begin. All changes will be recorded, including loop and scene launches, plus any parameter changes that you may decided to use, including changes to the Compressor, Beat Repeat, or volume or panning on any track. Once the recording is finished, you can go back and see what you’ve done in the Arrange window. This can be accessed by clicking the button with three horizontal lines at the top right of the screen, or by simply pressing Tab on the keyboard.

In this window we can cut loops short if they were played when they weren’t supposed to be, or extend them farther. We can also manually adjust automation curves simply by clicking.
i can't work in this software....
ReplyDeletebut ....
now i can do this .....
http://www.freeprosoftwarepaidapps.com