Monday, November 29, 2010

Finale Basic Tips

The end of the semester is fast approaching, which unfortunately also means the due dates for final projects are coming up.  To help you get through your projects maybe a little less painfully, here on the LC tech blog we'll be releasing a series of quick tips to help you troubleshoot some very common questions on many of the programs you'll be using.  Up first is everyone's "favorite" Finale.

1.  How do I change the page size of my Document?
  • Select the "Page Layout" tool
  • Under the "Page Layout" menu select "Page Size" and choose the size and orientation you want
  • Also be sure that under the “File” menu then “Printer Page Setup” the proper page size and orientation are selected
  • If you are printing here at the LC the page sizes available are:
      • US Letter (8.5x11) This is the standard size
      • US Legal (8.5x14) This is longer than the standard size
      • Tabloid (11x17) This is the big paper, which you may need for score
2.  How do I get a certain number of measures per system?
  • In the “Utilities” menu select “Fit Measures”
  • The “Fit Measures” window will open
      • (You can also get to this window by pressing Shift+Command+M)
  • Input the number of measures you would like per system then decide if you want this number for the whole piece or a specific range of measures
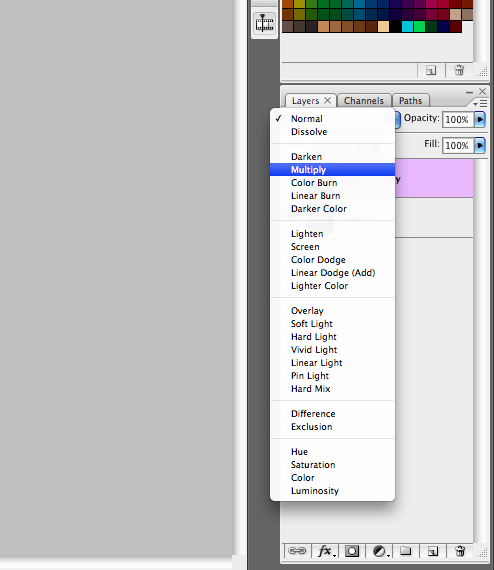
3.  How do I change the stem directions?
  • While in speedy entry or simple entry mode just hit “L”
4.  How do I write in rehearsal letters?

  • Select the expression tool
  • Double Click the beginning of the Measure
  • Chose “Rehearsal Marks” in the left hand menu of the Expression window
  • Select the style of rehearsal mark you want then click OK
5.  How do I change the size of my staffs in Finale?

  • Select “Resize Tool” (Percent “%” tool)
  • Click the staff, the resize window will open
  • Specify the percentage.
6.  How do I display measure numbers on every measure?
  • Select the “Measure Tool”
  • In the “Measure Menu” select “Edit Measure Number Regions”
  • Click the box next to “Show on every 1 measures beginning on measure 1” hit OK

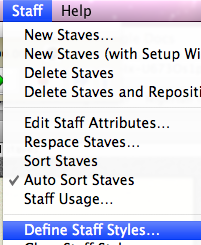
7.  How do I add more staves after I’ve already opened a document?
  • Click on the “Staff Tool”
  • Click on either “Add New Staves” and selected the number of Staves you wish to add
  • Or Click on “Add New Staves (with Setup Wizard)” to bring back the Document Setup-Add or Delete Instruments Window and select the instrument(s) you wish to add

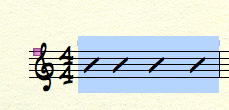
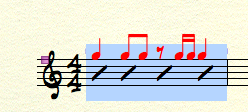
For information about how to do slash notation and kicks over please see our past blog post about “Kicks Over Time in Finale”  here.

Tuesday, November 23, 2010

Create a Thanksgiving Turkey in Adobe Illustrator

Adobe Illustrator is Adobe Creative Suite's vector graphics program.  Vector graphics instead of creating images from pixels create images from a series of points connected with straight lines or curves.  The advantage of this is they can be enlarged and reduced and still retain a perfect line, unlike bitmap images which get a fuzzy pixelated edge when resized.  So if you are thinking of creating a design that you may need in a variety of sizes (say CD cover to Poster), Illustrator might be the way to go.  Get started learning the basics of Illustrator over this long weekend (you can download a trial version of the program from Adobe's site) by creating a cute Thanksgiving Turkey.

click here to view the video tutorial

Sunday, November 21, 2010

Flex Time

 
One of the best additions to Logic 9 was “Flexible Audio.” Much like ProTools’ “Elastic Audio,” users can now zoom in and fix any audio they want to get that performance just right. And with Logic’s user-friendly design, this feature has been made easier than ever.

There are two approaches to using Flexible Audio. If you press ESC, Logic will open up a tool pop-up window listing several features. At the bottom, you will find Flex Tool (shortcut R). This approach to using Flex Time is the most easy and straightforward. When you click on the audio region you wish to edit, you will be shown a popup asking you how you wish to analyze the audio. These different options will analyze the audio differently according to its transients, depending on which one you do.

There are 4 options:


  • Slicing: Will separate the audio region into many different regions, useful for drum programming and editing.
  • Rhythmic: Meant for drums or percussion. Will NOT slice the audio, but allow you to make major transient adjustments. (Low CPU load)
  • Monophonic: Good for one voiced instruments and voice. (Medium CPU load)
  • Polyphonic: Best used for chorded instruments like guitar, piano, etc. (High CPU load)                                            
Using the best fit for your instrument, you will be able to make your adjustments with ease.

If you are looking to get more in depth with Flex Time, there is an option at the top of the Logic window labeled “Flex.” This will display a button on all of your tracks. Pressing the button, you’ll find that you’re offered the same options as before. However, when you enable one of the options, you’ll see the region go dark and become outlined with markers (see above). These markers mark the starts of the transients that Logic has recognized based on your selection (Monophonic, Rhythmic, etc.). This will enable you to manipulate the audio much further than you could with the previous option. As you alter your audio, the regions that you are stretching become Red, while the regions you are compressing become Green. To minimalize the audio effects of stretching the transients like this, be sure to find the place with least coloration. 

by Peter Brown

Wednesday, November 17, 2010

Adobe Bridge

Today's Blog post by lab monitor Peter B. is about a little used but very useful part of the Adobe Suite-Adobe Bridge.

Have you heard of it? Most people have, but nearly all are somewhat confused and ignorant at its purpose in existence. “What could I possibly use Bridge for? All I’m trying to do is to edit some pictures for my website/facebook/tumblr/blog!” As a result, it sits and waits, unused, jealous that Photoshop keeps getting all the clicks (see right).

Truth be told, it seems like an unnecessary step in editing pictures for whatever purpose you may have. However, if you were to open said program, you would be baffled and wondered at what its functions are, and how valuable Bridge becomes in organizing and viewing your photos.
The first thing you notice after selecting your folders (on the left hand side of the screen) is the sheer volume of information that becomes available to you about your photos. On the bottom left, you’ll see information regarding all of the photos inside the folder. In the folder that I have selected, I can see immediately that there 15 JPEG’s, 13 Photoshop doc’s, and 2 TIFF images. On the bottom right, you’ll see specific information regarding the file that you’ve selected in the content window. Literally EVERYTHING you need to know about said picture will be in this window.

The way you view your files can be customized as well. Looking at the top of the screen, you’ll notice this menu bar here: If you are partial to the “film reel” feel of things that is featured on Mac OSX, you may choose that option here by selecting the “filmstrip” option. The drop down arrow offers even more ways to look at your files. Almost every aspect of all of these options is customizable as well – from the size of the thumbnails to organizing them alphabetically.
       
Looking at a folder full of files in OSX’s Finder can be somewhat daunting. As a result, poor data management and overlooked problems can occur; whether it’s trying to import an incompatible file type, or accidentally uploading that embarrassing picture of you onto Facebook. In a world where file management is becoming increasingly valuable, Adobe’s Bridge offers an easy to use solution for all of your management concerns. So next time you see it sitting next to Photoshop, give it a click! You won’t be disappointed.

Sunday, November 14, 2010

Make Your Photo’s Pop In Photoshop

We are kicking Multimedia Week off with a Photoshop post by Leah one of our fine Lab Monitor Supervisors here at the LC.
While we would all love to have our pictures taken, brushed up, and beautified in a professional photography studio, not many of us can afford the cost of catalogue worthy photos and must make do with our Cannons, Kodaks, and iPhones.
I'm going to show you a little tip or two that you can use in Photoshop (or Gimp!) to give your portraits a little extra pop with no extra expense.
*This is beginner level, but it does assume that you can find your way around the main menus of Photoshop and are familiar with the general layout. I will provide pictures to help explain the process.
Ok, the first step is choosing your photo. For this example I will be using this guy:
Now, George has a pretty decent picture already, but it could be more interesting so we're going to help him out. Let's get started:
1. Open your picture in Photoshop;  You can go to File --> Open… or copy and paste it in, it's up to you.

2. Save As! There's nothing worse than making a mistake on a file and not having a backup of the original.
3. Right click on your photo layer and duplicate it so there are now two copies of the same layer.
4. Desaturate the copy layer by going to the Image menu --> Adjustments --> Desaturate. Or use the shortcut of Shift-Command-U.
5. Now we are going to blur it. Go to the Filter menu --> Blur --> Gaussian Blur… Apply a blur of about 5 points; you can add more or less depending on the picture and the effect you want, but 5 points works pretty well as a basis.
*The next two steps will have two different versions a and b. Try both paths!
6a. Go to the layer blend drop down box (this is usually right under the Layer Tab and is default set to normal). Change the layer blend style to Overlay.
7a. Marvel at the transformation! The resulting affect is that shadows are deepened and the contrast between light and dark is increased, giving the picture a more intense look and feel to it.  This effect can sometimes make the picture too bright. Lower the opacity on the copy layer to mitigate this.
 
Before:
After:
OR

6b. Go to the layer blend drop down box (this is usually right under the Layer Tab and is default set to normal). Change the layer blend style to Multiply.
7b. Great! Unlike the first effect, this makes the picture darker and gives it a more somber and grittier look. This effect can often make a photo look too dark. Lower the opacity on the copy layer to your satisfaction.
Before:
After:
8. Yay, George is beautiful! Both effects are simple, but can make a significant difference on the impression your photos make on others. Adjust and mess around with the settings until you get a look you are satisfied with.
*CAUTION: While both effects look cool, they can be easily overdone and dramatized—just like reverb. Please use artistic forethought.
*All the steps used here can be reproduced in GIMP, a program similar to Photoshop (but completely free!). Be warned that there are some differences in the menus.

Sunday, November 7, 2010

Kicks Over time in Finale

In today's blog to kick off the second Notation Week of the semester, we'll take a look at one of the most frequently asked Finale questions here at the LC: "How do I do kicks over time?"
1. Add notes into the second layer (switch layers in the bottom left corner of the window) up above the staff like this. Flip their stems using the keyboard shortcut “L”, and move the rest so it floats above by selecting the rest with the simple entry tool (option + click) and using the up and down arrows.


2. Select the staff tool, select the measures you want to have slash notation, and choose Apply Staff Style from the Staff menu. Choose slash notation. Now your notes are hidden behind the slashes, which we have to fix.


3. Choose Define Staff Styles from the staff menu, click select next to Alternate Notation, and check Notes under Other Layers.


4. VoilĂ ! Kicks over time!

Thursday, November 4, 2010

Setting Up a Basic Ableton Live Set

The Learning Center Work Studies are contributing their wealth of knowledge to the blog now! For our first post by a work study Eric Tait, Lab Monitor here at the LC and Electronic Production and Design Major, will explain setting up a basic Ableton Live Set.
Let’s take a look at setting up a simple Live Set for a performance. First, we’ll add an audio file into the first slot of track 1. All you have to do is locate your audio file in Finder and then drag it right over the slot, and Ableton will load the data. In this example, I used a guitar loop. In the second track I dragged the same loop, but will later change its pitch to create a harmony part. After that come bass, drums, and a drum “fill” track that uses the Beat Repeat to create some variation
.
The vertical columns are called Tracks while the horizontal rows are called Scenes. The audio loops in this example are arranged into ten different scenes, all of which can be launched by clicking the Scene Launch buttons, which are the small triangles located in the Master track on the right side of the screen. Launching by scene makes live performances easier, as the user can arrange the loops however he or she likes and launch the simultaneously.

Now that our loops are in place and arranged for a performance, we can add other elements. We’ll start by adding a Beat Repeat to the second drum track. Beat Repeat can be found in the Live Devices menu on the left side of the screen under Audio Effects. To add it to the drum track, simply click and drag it onto the track. The device will appear in the effects area at the bottom of the screen.
Next we’ll add a Compressor to an Auxiliary track for the drums. Once again, this effect can be found in the Live Devices under Audio Effects, but this time, we’ll drag it onto auxiliary track A on the right side of the Live screen. I decided that I wanted the drums to sound a little bigger, so I turned up send A on the drum track. This means that the drums will be processed through the compressor on Aux A, but the dry signal will also still be playing back from the original drum track.
To change the pitch of an audio file, simply double-click on the loop and adjust the dial labeled Transpose however you’d like. In this example, the second guitar part is transposed up +4, or a major third.
Now that everything is set up how I want it, it’s time to record. Click the record button in the transport menu at the top of the screen. Once a scene or single loop is launched, the recording will begin. All changes will be recorded, including loop and scene launches, plus any parameter changes that you may decided to use, including changes to the Compressor, Beat Repeat, or volume or panning on any track. Once the recording is finished, you can go back and see what you’ve done in the Arrange window. This can be accessed by clicking the button with three horizontal lines at the top right of the screen, or by simply pressing Tab on the keyboard.
In this window we can cut loops short if they were played when they weren’t supposed to be, or extend them farther. We can also manually adjust automation curves simply by clicking.