Friday, October 21, 2011

Fermata Friday: Making Simple Entry Simpler and Faster For Laptop Users

In Finale there are couple different ways to get the notes on the page, Simple Entry, Speedy Entry and Hyperscribe. All of which have their ups and downs relating to which setting you’re using them in. To get the most out of Speedy Entry and Hyperscribe you’re probably going to want to have a keyboard with a numeric pad and midi keyboard handy that you can plunk out the notes on. So, what do you do when you’re stuck using a laptop without all the other stuff?

The best way to optimize your speed (when using a laptop) with simple entry is to change your shortcut settings to the laptop default.

Select the simple entry tool in the Main Tool bar and then grab the Simple tab.


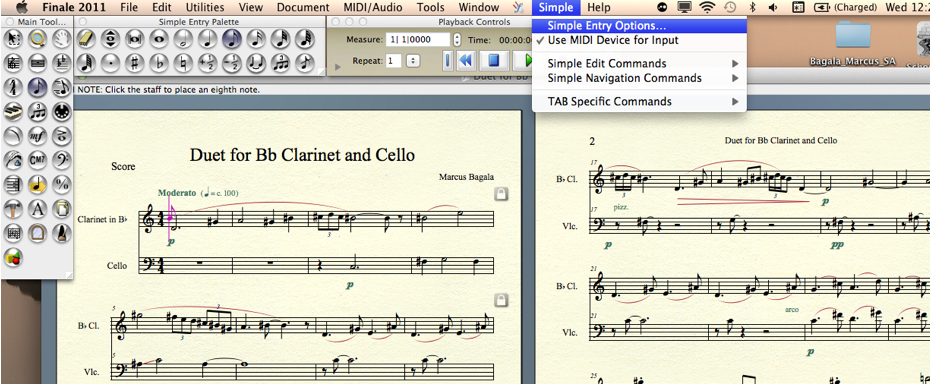
Once there click on “Edit Keyboard Shortcuts...” from here you can select which shortcut table you’d like to use. 


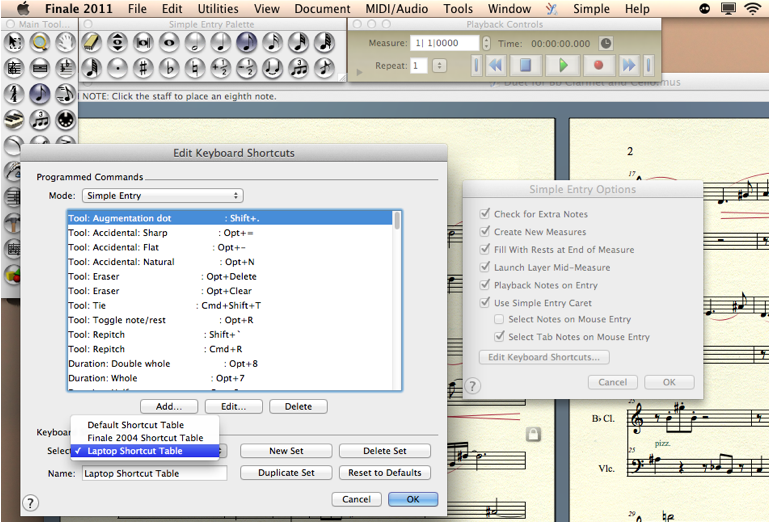
Once the Laptop Shortcut table is selected you’ll notice the main difference between the default shortcuts and the laptop ones is that the number keys at the top of your keyboard now control the rhythmic value of the notes (1 being a 64th note etc etc.) being entered while typing the letter of the note name will enter the note onto the page. Other key commands remain the same like T for tie, period to add a dotted value to a note and R for turning notes into rests.

-by LC Tech Blog contributor Marcus Bagala

Wednesday, October 19, 2011

Waveform Wednesday: Understanding Advanced Quantize in Logic


Logic has a very advanced quantize engine, but yet, there aren’t many who can really appreciate every and each function and get the most out from it. Although each term and function are quite well explained in the manual, here’s a bit more detailed explanation along with its practical usage.


Q-strength:  Be aware that no musician will ever play in perfect timing or even if they do, we - as a listener - wouldn’t like it since it will only sound like a machine. Main purpose of Q-strength is to defeat this fatal flaw of quantizing. It will adjust the amount of the quantization. At the default setting of 100 percent, quantized notes are moved to exactly the correct timing, but with a 50 percent setting, for example, the recorded events will be moved just halfway to the correct position. To tighten up the timing of a performance without destroying the groove, try a Q-Strength setting of 85-90 percent.

Q-range : Logic 9 user manual defines Q-range as : A very musical quantization strategy that requires a certain amount of technical musical prowess. Q-Range is ideal for recordings that already have the right groove but are too hurried or laid back in places.” In other word, if you very much like your groove but only want to fix a few sloppy notes that are too early or too late from the timeline), only those notes can be fixed through this engine.
Q-Range enables you to choose a boundary for the notes you wish to quantize. You do this by setting a timing threshold with the Q-Range value. Anything that falls inside (or outside) this threshold is quantized leaving the other notes untouched by the quantize engine. Setting Q-Range to a positive value will quantize anything within that range.  Setting Q-range to a negative value will quantize anything outside the threshold but leaving notes that were almost in time untouched. This is great for retaining a human feel to your performances while only correcting really duff timing on certain notes. Use the lowest value you can get away with or set a slightly higher value and use Q-Strength to adjust the amount of quantization.

Q-flam :
Q-Flam is useful for separating events that fall on the same timing value. It spreads out the notes and essentially creates flams. Setting a positive Q-Flam value will offset the notes in the chord by the set value from bottom to top. Setting a negative value will offset each note by the set value from top to bottom.

Q-Velocity and Q-Length
Let’s say that you have a bass line that’s leading the rhythm section and want the other instruments to follow its groove so that the rhythm section can be locked-in nicely together. It can be done through creating a groove(quantize) template out of your bass groove then quantizing your new instrument by adopting time or velocity or the length from the original bass groove template . You can use Q-velocity and Q-length to set the amount of the groove template affecting your new quantization, using a percentage. A value set to 0% has no effect, whereas at 100% the notes adopt the exact velocity & lengths of the template region.

-by LC Tech blog contributor Jay Lee

Friday, October 14, 2011

Fermata Friday: Creating Kicks Over Time in Sibelius

If you have any experience using Finale, you’re probably well aware that creating kicks over time is not exactly an intuitive process. Thankfully, Sibelius has a bit of a different approach to this ever so common notation.

To start, select layer 1 on the keypad and enter your “kicks” on the first space above the staff.


Next, switch to layer 2 on the keypad and enter four quarter notes on the middle line of the staff.


Now, select the quarter notes you just entered and hit ⌥⇧3 (option+shift+3).


Voilà! You now have slash notation under your “kicks”. The only thing you may have left to do is select any rests and nudge them up a bit.

-by LC Tech Blog contributor Michal Skrzypek

Wednesday, October 12, 2011

Waveform Wednesday: Tidying Up A Logic Session (part 1)


Does the amount of information on your arrange window ever make you feel claustrophobic?   In Logic, we can organize untidy tracks and regions in various ways.  Here is one feature that sweeps tracks “under the rug,” so to speak.


In this session there are 14 tracks full of regions.  When we are done editing any of the tracks, we can get them out of our hair using the ‘Hide’ feature.

Click on the “H” icon located at the top left of the arrange window.  The icon will turn green and an “H” icon will appear next to the “record enable” feature of each track.


Once you decide that a track is done for the time being, click on the “H” icon for that track, then click back on the “H” icon located at the top left of the arrange window to hide the tracks the tracks that don’t need to clutter up your space. 


You will notice the original green “H” icon turns orange, and your tracks are now out of the way, and can be brought back at any time, simply by clicking back on the “H.”

-by LC Tech Blog contributor Lonn Hayes


Wednesday, October 5, 2011

Waveform Wednesday: Pro Tools Keyboard Focus Mode


Ever wonder what the “az” icon was in Pro Tools? Well, it enables “keyboard focus” mode. Keyboard Focus mode is awesome, because it dramatically improves the speed and efficiency of your Pro Tools workflow. Think of keyboard focus mode as even quicker keyboard shortcuts, which allow you to execute commands in a single keystroke rather than having to use multiple keys.
There are three areas inside of Pro Tools in which you can enable keyboard focus. They are: the edit window, the regions window, and the groups window. To quickly switch between the three areas of keyboard focus, simply press Command+Option+1 to enable keyboard focus in the edit window, Command+Option+2 to enable it in the regions window, Command+Option+3 to enable it in the Groups window.

Here are some common one-key key commands available in edit mode:

T – Zoom in
R – Zoom out
C – Copy
V – Paste
L – Tab left
‘ – Tab Right
P – Tab up to next track
; - Tab down to next track

In Groups mode, keyboard focus works a bit differently. You can assign a key to a specific group and when you have keyboard focus enabled in groups mode, you can use that key to enable or disable that group. Pretty neato.

In the Regions list, keyboard focus acts as an alphabetical organizer, or address book. Just start typing in the name of the region you would like to find and there you go.

-by LC Tech Blog contributor Taylor Hatty

Monday, October 3, 2011

Mac Daddy Monday: Take a Screen Shot with the Mouse Cursor Included

As we have been doing these blog posts we take a lot of screen shots. The easiest way to do this is with the keyboard shortcut SHIFT-COMMAND-3 to get the entire screen, and SHIFT-COMMAND-4 to get a crosshair cursor to select the screen shot area. This will put the new image file right on the desktop.

The problem with this method however, is that the mouse cursor is not included. In many applications the mouse cursor is contextual, and changes based on where you point it. In these blog posts we like to point that out in the screen shots, so here is what we do:

Instead of this screen shot method, use the application Grab, which is in Applications - Utilities.

Open Grab’s preferences, and you can choose which mouse cursor to use.

This however, doesn’t show the natural cursor, so in situations where the cursor changes within the application, this method won’t work. There are many 3rd party screen capture applications that will capture the actual mouse cursor.

Try Jing (free): http://www.techsmith.com/Jing/
Little Snapper (free trail download, then you must purchase): http://www.realmacsoftware.com/littlesnapper/
Screen Flow (also not free): http://www.telestream.net/screen-flow/
or Snapz Pro (also not free): http://www.ambrosiasw.com/utilities/snapzprox/
Screen Flow and Snapz Pro are more expensive, but they are full feature screen casting studio apps geared toward video bloggers and podcast makers.

Find any more? Post them up in the comments below.

-by LC Tech Blog contributor Chris Fitzgerald