


A very
useful
tool
in
Logic,
the
comp
tool
allows
you
to
pick
the
best
parts
from
different
takes
of
the
same
instrument,
pasting
them
together
to
get
the
‘perfect’
take!
 Step
1:
Start
recording
a
few
takes
on
the
same
track.
Logic
is
very
intuitive
where
you
can
record
over
the
previous
take
without
losing
or
destroying
the
takes
before.
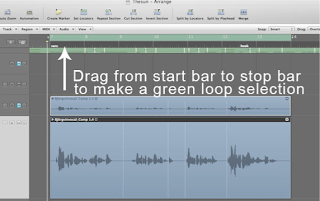
A
good
way
to
do
this
is
to
turn
on
loop
recording
where
you
can
record
a
few
takes
at
once.
Step
1:
Start
recording
a
few
takes
on
the
same
track.
Logic
is
very
intuitive
where
you
can
record
over
the
previous
take
without
losing
or
destroying
the
takes
before.
A
good
way
to
do
this
is
to
turn
on
loop
recording
where
you
can
record
a
few
takes
at
once.
Step 2: Once you have the tracks recorded, double click on the region to show all takes. You may click once on the individual tracks to listen to them to pick the best parts from the different takes. Placing the cursor over the tracks will bring up the ‘comp tool’ that looks like a vertical bar. Click and drag over parts from the different takes that you want to use for your final track. The blue regions are the ones assimilating the top track and the white regions are the unused regions.

Step 3: Once you are satisfied with the final track from the different takes, you can either choose to create a new audio file of the track or just remove the unwanted region. By clicking the arrow on the top right hand corner of the top track (final track), a drop down menu will appear where you will see ‘flatten’ or ‘flatten and merge’. ‘Flatten’ is to just to get rid of the unwanted regions but ‘flatten and merge’ will create a new audio file (it works like ‘glue’ )
There you have your perfect take!
-by LC Tech Blog contributor Stephanie Tham
 Step
1:
Start
recording
a
few
takes
on
the
same
track.
Logic
is
very
intuitive
where
you
can
record
over
the
previous
take
without
losing
or
destroying
the
takes
before.
A
good
way
to
do
this
is
to
turn
on
loop
recording
where
you
can
record
a
few
takes
at
once.
Step
1:
Start
recording
a
few
takes
on
the
same
track.
Logic
is
very
intuitive
where
you
can
record
over
the
previous
take
without
losing
or
destroying
the
takes
before.
A
good
way
to
do
this
is
to
turn
on
loop
recording
where
you
can
record
a
few
takes
at
once.
Step 2: Once you have the tracks recorded, double click on the region to show all takes. You may click once on the individual tracks to listen to them to pick the best parts from the different takes. Placing the cursor over the tracks will bring up the ‘comp tool’ that looks like a vertical bar. Click and drag over parts from the different takes that you want to use for your final track. The blue regions are the ones assimilating the top track and the white regions are the unused regions.

Step 3: Once you are satisfied with the final track from the different takes, you can either choose to create a new audio file of the track or just remove the unwanted region. By clicking the arrow on the top right hand corner of the top track (final track), a drop down menu will appear where you will see ‘flatten’ or ‘flatten and merge’. ‘Flatten’ is to just to get rid of the unwanted regions but ‘flatten and merge’ will create a new audio file (it works like ‘glue’ )
There you have your perfect take!
-by LC Tech Blog contributor Stephanie Tham


