Audio sampling is something that I have come across recently and consequently am having a lot of fun with. I have sampled everything from the Duke to Samuel L. Jackson in pulp fiction. The great thing about audio sampling is that you can take any sound you want, and make an instrument from it. Now there are plenty of methods and various ways of going about this but here is how I learned and it’s pretty easy. With a few steps you can create your own audio samples and load them into an instrument.
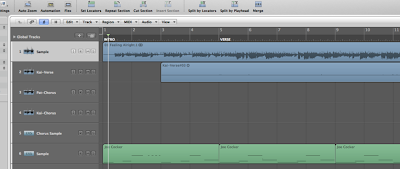
 The first thing you want to do is import the track you want to sample from, onto an audio track in Logic. As you can see I have loaded the sample “Feelin Alright” by Joe Cocker into Logic.
 The next thing we want to do is select your region and go to the sample editor window. Here we can edit what audio samples we want to save, in order to create an instrument. We want to select sections of the song, not the whole thing. This way when we create the instrument we can simply trigger the sections through our MIDI work stations.
So go ahead and select how many ever samples you want by highlighting the section of music you would like sampled, going to the audio file tab and selecting “save selection as.” Save them all to the same place so you can find them easily when we go to create our instrument. For this particular project I had 7 different samples.
Now that we have created our samples, its time to load them into an instrument in Logic. The first thing we need to do is create a midi track and load in the EXS24. This is a great sampler.
Next we open up the EXS24 and select “edit.” Here we get the EXS24 Instrument Editor. This window allows us to create out sampled instrument.
From here we need to go “Zone” and then “Load Multiple Samples.” Go find the samples you created and load them all in. Shift click them all and click “add” and then “done.”
Now this box appears. We want contiguous zones selected and now its asking us for “zone width” and “start note.” The start note is the key the sample will begin on. It defaults to C1 which is fine. The zone width determines if the sample can be played in different pitches. If you change the zone width from 1, the default, to 12 there will be 12 half steps of the sample. A whole octave. This can be done to your preference. For our purpose we will leave the zone width to one and that is something you can experiment with at a later time. Click “ok.”
So now our samples are loaded into our instrument. Go ahead and play it.
Cool right?
Theres a couple things you should be aware of now. First of all the 1shot box is going to be checked by default. This means that the whole sample will be played by the trigger. Doesn’t matter if the sample is 2 seconds or 2 minutes long. The whole thing sample play. Personally I uncheck these boxes so that I can control how long the sample is by how long I hold the trigger down. This also helps create rhythm with our samples. Also there is a reverse option to the right of the 1shot box. Check these boxes if you’d like your sample played in reverse. Sometimes this can have a very cool effect.
Be sure to save the instrument as you X out of the Sample Instrument Editor window. Record enable and you’re ready to add your newly created sampler to any projects you have going.
Enjoy!
by Kai Sorensen, LC Tech Blog contributor


0 comments:
Post a Comment